Details:
Filtering your email
Overview
You can use email filters to send messages to certain places depending on their
contents. You can use filters to sort mail between business and pleasure, to
delete unwanted mail, or to sort mail in another manner.
Steps
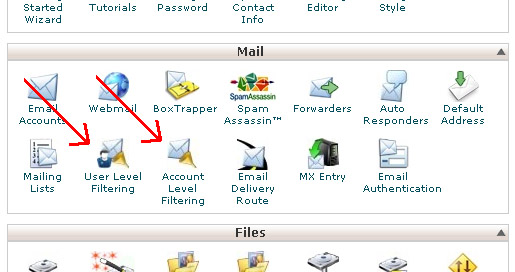
1 Select the appropriate icon for the filtering level you wish, as shown, below. If
you wish to filter one account only, choose "User Level Filtering" to use this filter
on all email accounts, choose "Account Level Filtering"
 2 To add an email filter, click on Add Filter.
3 Now select the part of the message that you wish the filter to look at from the
first drop box.
4 Select how specific you wish the filter to be from the second drop box.
5 Enter the word(s) you wish to be used to filter in the blank field.
6 You can make complex filters by clicking the button with the plus sign to the right
of the condition fields to include another condition. See image, below.
2 To add an email filter, click on Add Filter.
3 Now select the part of the message that you wish the filter to look at from the
first drop box.
4 Select how specific you wish the filter to be from the second drop box.
5 Enter the word(s) you wish to be used to filter in the blank field.
6 You can make complex filters by clicking the button with the plus sign to the right
of the condition fields to include another condition. See image, below.
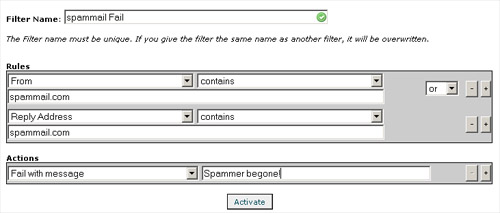 7 Enter the destination for email that matches this filter in the blank field next to
Destination (If you wish to have the email deleted, enter Discard in this field. To
have the email sent to a different email address, enter that address in the field).
Troubleshooting
Type a message in the Filter Test box on the Filter Maintenance menu and click on
Test Filter to see where the message will go. Use the word(s) from your filter(s) in
this message to test if they work.
7 Enter the destination for email that matches this filter in the blank field next to
Destination (If you wish to have the email deleted, enter Discard in this field. To
have the email sent to a different email address, enter that address in the field).
Troubleshooting
Type a message in the Filter Test box on the Filter Maintenance menu and click on
Test Filter to see where the message will go. Use the word(s) from your filter(s) in
this message to test if they work.